Baked mineral foundation versus pressed makeup powder

Beauty lovers everywhere are trading in their bottles of liquid foundation for a dusting of baked mineral foundation, and for good reason. It’s nourishing and kind to your skin. You can feel good knowing that you’re doing your skin a favor by refraining from using chemical-laden cosmetics and opting for mineral-infused alternatives that will not only improve your skin, but will also provide a naturally radiant complexion.
How does baked mineral foundation differ from pressed makeup powder? We’ll explore this topic and uncover why baked mineral foundation is becoming a staple in every natural beauty enthusiast's makeup arsenal. Also, stay tuned for foolproof application tips. But first, let’s start at the beginning:
What is baked mineral foundation?
Baked minerals are a unique innovation created by Italian artisans, who hand-mix a blend of natural mineral powders and ingredients such as Organic Jojoba Oil, Safflower Seed Oil, Vitamin E, and plant extracts of Lavender, Thyme, Green Tea, Rosemary and Magnolia Bark, and then pour the mixture onto terracotta tiles to dry. After the slow-baking process is complete, the result is an ultra-light, velvety smooth foundation disc that retains its hydrating essence.
Beauty Battle: pressed powder vs. baked mineral foundation
Non-mineral pressed powder comes in a compact and often contains ingredients such as silicone, wax, oil, and dye, which serve to keep the formula in a solid form but are known to cause irritation for those with sensitive skin. Also, the particles of these substances are large in size and can make the powder stick to the surface of the skin, resulting in an unnatural appearance.
Baked mineral foundation beats the competition in terms of purity and results. It contains 100% natural minerals and botanical extracts, and is free from skin irritants and chemicals. It also boasts anti-microbial and anti-inflammatory properties to help your skin look and feel its best.
While baked mineral foundation may look like a powder, it acts more like a liquid formula. Once applied, the powder is virtually undetectable as it re-liquefies and gently melts into the skin to smooth out the appearance of lines and pores, rather than clinging to the surface like pressed powders and emphasizing unsightly lines or blemishes.
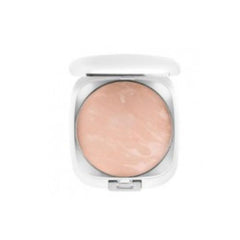
If you look at a baked mineral foundation compact, you will notice glistening veins of color running through it, giving it a more luminous appearance compared to pressed powders. This is exactly how it translates on the skin - instead of a matte finish, mineral-infused powders give your skin a dewy, healthy glow.
The shimmering effect is created by light-refracting minerals, which allow the makeup pigments to adjust to any skin tone and seamlessly blend in. The light-reflective particles also provide a soft-focus, wrinkle-minimizing, flawless finish.
Mineral foundation is the clear winner when it comes to controlling how much coverage you want, without having to worry about it looking cakey. What’s more, it stays put without additional touch-ups. You can kiss goodbye to midday makeup runoffs!
With Abbey St Clare’s Baked Mineral Foundation, you get to enjoy the velvety smooth texture of a liquid-like formula that blends beautifully, with minerals that nurture and hydrate your skin, and the convenience of a powder compact.
How to apply baked mineral makeup
Whether you are a novice or a savvy mineral beauty buff, we have some tips to help you get the most out of your mineral foundation and achieve a naturally beautiful look.
Step 1: Prep your skin. Set the stage with a fresh canvas before applying makeup, by cleansing your face with a gentle face wash, followed by a swipe of toner. Allow the actives in the toner to be absorbed into your skin for 1-2 minutes before you move on to the next step.
Step 2: Moisturize. Mineral foundation tends to adhere better when applied to skin that’s plump with moisture. Apply a moisturizing serum, cream, or facial oil to your face and neck and allow it to absorb for a few minutes. If any remains on the surface, massage it gently into the skin to ensure that you are receiving the full benefit of its actives.
Step 3: Camouflage. Using a concealer brush or the pad of your ring finger, lightly tap in a mineral concealer (we recommend Soft Focus Mineral Concealer) over any blemishes, dark spots, or red patches.
Now that your skin is primed, it’s ready for mineral foundation!
Baked mineral foundation can be used on its own or as a setting powder over a cream foundation such as Mineral Sheer Tint Foundation or BB Cream if you prefer more coverage. It also works well as a base upon which to apply blush, contour, bronzer, or highlighter.
Tip from the Abbey: When choosing the right shade of foundation, select one that matches your neck and chest, rather than your face. This will make your foundation blend seamlessly.
Step 4: Load the brush. Using our Luscious Kabuki Brush, or your favorite large-head brush, make a few swipes over the mineral foundation compact, then tap lightly to evenly distribute the powder over the head of the brush.
Step 5: Buff onto your skin. With your brush loaded, start from the center of your face and move outward in circular motions toward your hairline to ensure even coverage. Don’t forget to apply the mineral foundation to your ears, neck, and under your chin.
Step 6: Gradually build up coverage. A little baked mineral foundation can go a long way, so take it easy. Apply one light layer at a time until your desired coverage is achieved.
Step 7: Add a flush of color. Bring a light dusting of color to the apples of your cheeks with a mineral blush. (For a more natural appearance, use the foundation brush to lightly feather color into skin.) To give your skin a natural sunkissed glow, apply a light dusting of mineral-based bronzer to your forehead, cheeks, nose, and chin.
Leave a comment
Comments will be approved before showing up.
Also in Abbey St Clare Blog

The Wheel is Turning. Abbey St. Clare has Closed.
Hello Friends,
The wheel is turning. Transitions are on the horizon. It is with regret that after almost twenty years, Abbey St. Clare is winding down as retirement and a relocation take place in the near future. We will continue taking orders through September 15.

Fix These 5 Hair-Washing Mistakes For Healthier Hair
Is your hair feeling brittle? Scalp dry? Locks not as lustrous as you want them to be? It’s possible you’re damaging your hair with five hair-washing mistakes.
If you follow these guidelines, you will see significant improvement in your hair and scalp health.

Pamper Your Skin and Elevate Your Mood With Essential Oils
Have you ever caught a whiff of cinnamon and felt a boost in your mood instantly? Do you feel calmer and more at ease when using lavender lotion before bed? If you said yes, it’s not just a figment of your imagination!
Ask anybody who uses essential oils regularly, and they’ll probably agree: these natural botanicals can have powerful, positive effects on your mood and overall wellness.


